Getting started with portals: writing a portlet with Spring Portlet Mvc and deploying it to a portal
In this article, we first talk about portals and when they should be used. Then we talk about Java portlets and their specification, after which we write a portlet with Spring Portlet Mvc. Finally, we deploy the portlet we wrote on Liferay, the leading Java portal.
Portals
A portal is a collection of windowed mini web applications, called portlets, which support features like personalization, content aggregation, integration into a foreign portal, authentication and customization. The portal itself usually offers things like an eventing system, single sign on, a portal search, tons of community stuff and facilitates easy communication between the different windows/portlets.
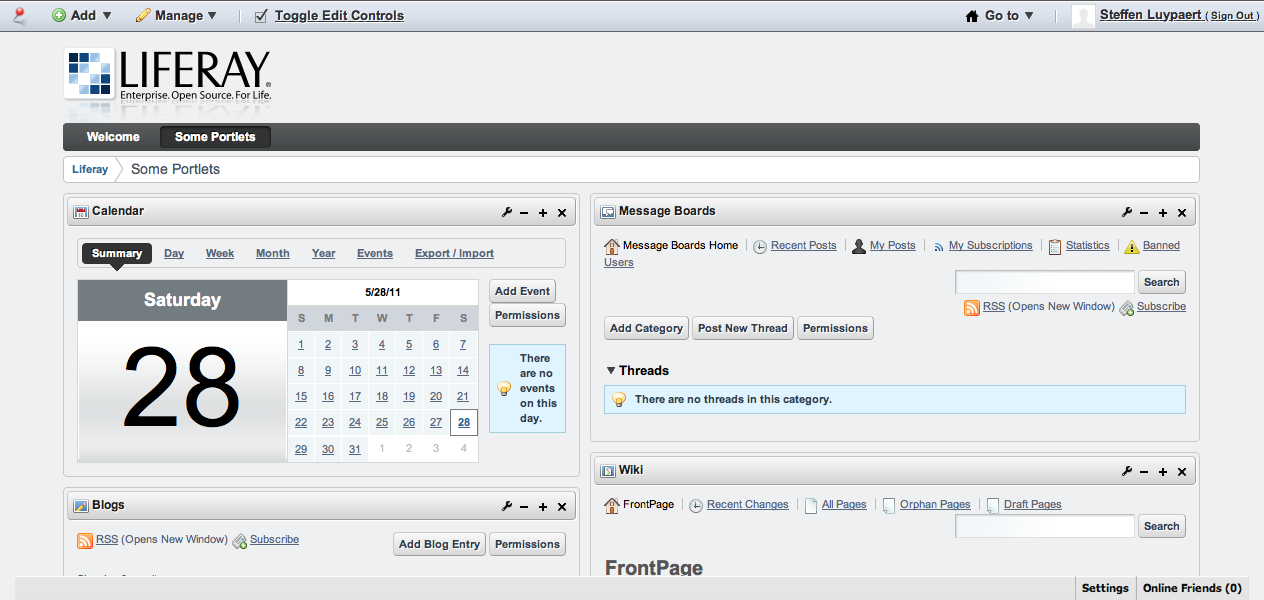
In the screenshot below we see an example of a portal page. Notice all the different windows, each one representing a small web application.
Popularity
Some years ago, portals were heavily hyped, as the future of the web even, but these days, not anymore. I even met some people who think they are plain useless and should be buried. Then I met some enthusiasts again who see more uses for them than I do.
Uses
Community websites
A portal like Liferay offers tons of features out of the box. If you need an instant messaging system, wikis, forums, message boards, document management, auditing, polls, a chat system, friends lists, blogs and calendars, combined with custom development, Liferay is probably one of the best choices around. You definitely do not want to start building all these things – which have been implemented a 1000 times before – yourself. You could use seperate packages, such as JForum or something, but these would still need a lot of integration and custom work. You could go with a PHP solution such as Drupal or WordPress, but if you are a Java developer/member of a team of Java developers, you are probably not a fan of doing all the custom development in php. Hence, Liferay.
To put it bold, if I would have to make a Facebook, LinkedIn or Youtube, I would make it with Liferay.
Let’s hope people are not going to fire load issue questions at me now. If they do, I am just going to point them to the Liferay Performance whitepapers.
Since I am on a portal/Liferay marketing roll anyway, people can view a list of sites that use Liferay here. Unlike what people might be thinking by now, I am not getting paid by Liferay for this article.
Enterprise websites backed by a SOA
But what if you do not need all the community stuff?
In which case is using the portlet specification over the servlet specification useful by nature, without having to fallback on other portal features to defend its use?
This can only be when all the seperate portlets add value over building the solution as a few classic web applications. If one portlet allows to select a customer, some other portlets could be fed this selection as input for example. This beats making a view interface to get a customer for every seperate web application.
Unfortunately, this will only work when there is already a clean modularization on the backend. If the backend consists of one database and one huge model, things will get too intertwined, and such modularization on the view level will become a headache instead of an advantage.
This is why I think an enterprise portal needs to be backed by a service oriented architecture, in which there are clearly seperated services which should be integrated with each other. The power of portlets comes from the ease with which they integrate disparate sources. So, they should be used when there is not one source of content but when there are multiple sources of content.
When not to use
Most web applications do not need a community and most web applications are (arguably) not an integration of many disparate content sources. Hence, in my opinion, portals are rather a niche product than a good overall solution.
Some argue that portals offer another level of abstraction over web development and that more things are taken care of for a developer. Sure, but at the same time, the developer is confronted with a lot more complexity, is constrained more and in my experience, many portal projects end up modifying the portal software itself which ties the developed software to some particular portal, destroying the portability argument. For Liferay for example, people usually rely on the Liferay specific window state “exclusive” for ajax requests, use the Liferay specific action-url-redirect to apply the post-redirect-get pattern and when custom authentication logic is necessary, Liferay hooks are built which rely on specific Liferay api. Sometimes you wonder why there is only a portlet spec and not a portal spec.
Portals are not a one-size-fits-all solution. If you do not have the feeling a portal is a perfect fit for your needs, you probably should not use one.
Portlets
We know now what a portlet is. A mini web application. A window on a portal page. But we didn’t dive into the technical details until now.
The portlet container
In short, the portal utilizes a portlet container to manage the lifecycle of the portlets just like a servlet container is used to manage the lifecycle of servlets. A portlet container is responsible for the initialization, request processing and destruction of portlets. The Java Portlet Specification defines the contract between a compliant portlet container and portlets. This standardization allows for portability of portlets between portal implementations.
Portlet versus servlet development
Portlet development is very similar to servlet development. The portlet API is modeled after the servlet API. The Portlet, PortletContext, PortletRequest and PortletResponse are very similar to their servlet counterparts. The major difference is that portlets only render a fragment of an html page, instead of a whole page.
The portlet specification
However, there still are some differences between portlet and servlet development.
We discuss the 3 most important portlet specific features now.
a. Different phases
With portlets, a request has at least two distinct phases: the action phase and the render phase. The action phase is executed only once. This is the moment where any backend actions occur. In the render phase the view is rendered to the user. Unlike the action phase, the render phase can be executed multiple times for a single request. With servlets, there is no such distinction on the API level, and these phases is something a portlet developer has to get used to.
b. Portlet modes
A portlet can have different display modes. The portlet mode determines what content the portlet should generate. The Portlet API defines 3 portlet modes: view, edit and help. In view mode, a user typically views data. In edit mode, a user typically modifies data. In help mode, a user can consult help about the portlet. A portlet developer can add any number of custom portlet modes to a portlet.
c. Window states
A window state indicates the amount of portal page space that should be assigned to a portlet. The portlet API defines 3 window states: normal, minimized and maximized. Any portal is allowed to define additional window states. Liferay, for example, has one additional window state, “exclusive”, which just renders the page fragment coming from the portlet, without decorating it with the entire portal page. Very useful when there is a need for Ajax integration.
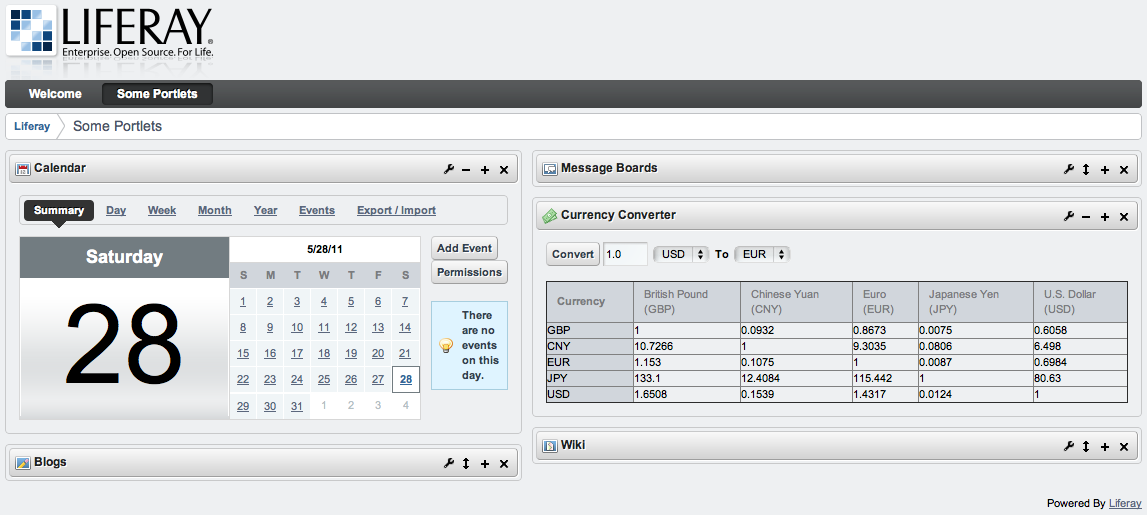
In the screenshot below, we see the portal page with the portlets again. This time however, some of them have the portlet window state “minimized”, the others still have window state “normal.” Note that every portlet has some icons. These will either change the window state(to maximize it for example), or they will change the portlet mode, from “view” mode to “edit” mode for example.
Writing a portlet
Spring Portlet Mvc
The Spring Portlet Mvc framework is a mirror image of the Spring Web Mvc framework, and uses the same underlying view abstractions and integration technology. Therefore, different Web Mvc classes will be reused.
It is also important to realize that when using Spring Portlet Mvc, you will no longer write your own Portlet but use the Spring Mvc one(just like you dont write your own servlets when using Spring Web Mvc).
Project structure
We are going to create one of the simplest Spring Portlet Mvc portlets possible.
The files we will need are the following:
- /src/main/java/com/integratingstuff/portlets/test/SampleController
- /src/main/webapp/WEB-INF/portlet.xml
- /src/main/webapp/WEB-INF/springContextConfig.xml
- /src/main/webapp/WEB-INF/web.xml
- /src/main/webapp/WEB-INF/jsp/demo.jsp
- /pom.xml
In comparison with a regular webapp, there is only one portlet specific file: portlet.xml.
portlet.xml
The portlet.xml file is our most important file. It defines our portlet.
<?xml version="1.0" encoding="ISO-8859-1"?>
<portlet-app xmlns="http://java.sun.com/xml/ns/portlet/portlet-app_2_0.xsd"
	version="2.0" xmlns:xsi="http://www.w3.org/2001/XMLSchema-instance"
	xsi:schemaLocation="http://java.sun.com/xml/ns/portlet/portlet-app_2_0.xsd">

	<portlet>
		<portlet-name>sample</portlet-name>
		<portlet-class>org.springframework.web.portlet.DispatcherPortlet</portlet-class>
		<init-param>
			<name>contextConfigLocation</name>
			<value>
				/WEB-INF/springContextConfig.xml
			</value>
		</init-param>
		<supports>
			<mime-type>text/html</mime-type>
			<portlet-mode>view</portlet-mode>
		</supports>
		<portlet-info>
			<title>Portlet Mvc Demo</title>
		</portlet-info>
	</portlet>

</portlet-app>
Portlet Mvc is designed around a portlet that dispatches requests to spring portlet mvc controllers. However, the DispatcherPortlet does more than only that. It also makes sure that the portlet is completely integrated with the Spring ApplicationContext and the developer is able to use every other Spring feature.
You will probably notice that we, in this tutorial, are developing a portlet that only supports the “view” portlet mode.
Note also how we point the portlet to our spring contextConfigLocation. If we would not add this init-param, the DispatcherPortlet will look for the default [portlet-name]-portlet.xml file in the WEB-INF directory. If this file would not be present, an exception would be thrown at deploy time.
springContextConfig.xml
On initialization of the DispatcherPortlet, the framework will create the bean definitions defined in this file.
<?xml version="1.0" encoding="UTF-8"?>
<beans xmlns="http://www.springframework.org/schema/beans"
	xmlns:xsi="http://www.w3.org/2001/XMLSchema-instance"
	xmlns:util="http://www.springframework.org/schema/util"
	xsi:schemaLocation="
		http://www.springframework.org/schema/beans http://www.springframework.org/schema/beans/spring-beans-3.0.xsd
		http://www.springframework.org/schema/util http://www.springframework.org/schema/util/spring-util-3.0.xsd"
	>

	<bean id="sampleController" class="com.integratingstuff.portlets.test.SampleController">
	</bean>

	<bean id="portletModeHandlerMapping" class="org.springframework.web.portlet.handler.PortletModeHandlerMapping">
	    <property name="portletModeMap">
	        <map>
	        	<entry key="view" value-ref="sampleController"/>
	        </map>
	    </property>
	</bean>

	<bean id="viewResolver" class="org.springframework.web.servlet.view.UrlBasedViewResolver">
	    <property name="prefix" value="/WEB-INF/jsp/"/>
	    <property name="suffix" value=".jsp"/>
	    <property name="viewClass"><value>org.springframework.web.servlet.view.JstlView</value></property>
	</bean>

</beans>
We have one custom controller, which we will discuss later.
Note how this controller is mapped on the view portlet mode in the PortletModeHandlerMapping bean, which is the bean the DispatcherPortlet will use to decide which controller to execute.
The last bean to discuss is our viewResolver. Note that this bean is a member of the regular spring mvc framework and not a member of a portlet specific package. This is because spring portlet mvc reuses all spring mvc view technologies, as we already said when we introduced Spring Portlet mvc. How this is possible is discussed in the next section.
web.xml
We also need a valid web.xml file:
<?xml version="1.0" encoding="UTF-8"?>
<web-app id="WebApp_ID" version="2.4" xmlns="http://java.sun.com/xml/ns/j2ee"
	xmlns:xsi="http://www.w3.org/2001/XMLSchema-instance"
	xsi:schemaLocation="http://java.sun.com/xml/ns/j2ee http://java.sun.com/xml/ns/j2ee/web-app_2_4.xsd">

	<display-name>portletMvcDemo</display-name>

	<servlet>
		<servlet-name>ViewRendererServlet</servlet-name>
		<servlet-class>org.springframework.web.servlet.ViewRendererServlet</servlet-class>
	</servlet>
	<servlet-mapping>
		<servlet-name>ViewRendererServlet</servlet-name>
		<url-pattern>/WEB-INF/servlet/view</url-pattern>
	</servlet-mapping>

</web-app>
When using Spring Portlet mvc, this file will always declare the ViewRendererServlet. To be able to reuse all the view technologies from Spring Web Mvc, the PortletRequest and Response need to be converted to a HttpServletRequest and Response in order to execute the render method of the (regular Spring Web Mvc) View. In order to do this, DispatcherPortlet uses the special ViewRendererServlet which only exists for this purpose.
SampleController
package com.integratingstuff.portlets.test;

import javax.portlet.RenderRequest;
import javax.portlet.RenderResponse;

import org.springframework.web.portlet.ModelAndView;
import org.springframework.web.portlet.mvc.AbstractController;

public class SampleController extends AbstractController {

	public ModelAndView handleRenderRequestInternal(RenderRequest request, RenderResponse response) throws Exception {
		ModelAndView mav = new ModelAndView("demo");
		mav.addObject("message", "Check it out!");
		return mav;
	}

}
Note that there are actually two methods to implement for our subclass of AbstractController: handleActionRequestInternal and handleRenderRequestInternal. We are not doing any backend action, we are just building and rendering the view, hence we only override the handleRenderRequestInternal method.
demo.jsp
We are returning a “demo” view from our controller, which our viewResolver resolves to the following demo.jsp:
<%@ page contentType="text/html; charset=UTF-8" pageEncoding="UTF-8"%>
This is our test portlet.<br/>
Message: ${message}
This is just a regular jsp.
pom.xml
This project was developed as a Maven project. This Maven pom.xml file is not essential for portlets at all, but for the people copy pasting along, the pom is printed here for easy reference:
<project xmlns="http://maven.apache.org/POM/4.0.0" xmlns:xsi="http://www.w3.org/2001/XMLSchema-instance"
	xsi:schemaLocation="http://maven.apache.org/POM/4.0.0 http://maven.apache.org/xsd/maven-4.0.0.xsd">
	<modelVersion>4.0.0</modelVersion>
	<groupId>com.integratingstuff.portlets.test</groupId>
	<artifactId>portletMvcDemo</artifactId>
	<version>1.0</version>
	<packaging>war</packaging>
	<dependencies>

		<dependency>
			<groupId>javax.servlet</groupId>
			<artifactId>servlet-api</artifactId>
			<version>2.5</version>
			<scope>provided</scope>
		</dependency>
		<dependency>
			<groupId>javax.servlet.jsp</groupId>
			<artifactId>jsp-api</artifactId>
			<version>2.1</version>
			<scope>provided</scope>
		</dependency>

		<dependency>
			<groupId>junit</groupId>
			<artifactId>junit</artifactId>
			<version>4.8.2</version>
			<scope>test</scope>
		</dependency>

		<dependency>
			<groupId>org.slf4j</groupId>
			<artifactId>slf4j-api</artifactId>
			<version>1.6.1</version>
		</dependency>
		<dependency>
			<groupId>org.slf4j</groupId>
			<artifactId>slf4j-log4j12</artifactId>
			<version>1.6.1</version>
		</dependency>
		<dependency>
			<groupId>commons-collections</groupId>
			<artifactId>commons-collections</artifactId>
			<version>3.2.1</version>
		</dependency>
		<dependency>
			<groupId>commons-digester</groupId>
			<artifactId>commons-digester</artifactId>
			<version>2.1</version>
		</dependency>

		<dependency>
			<groupId>org.springframework</groupId>
			<artifactId>spring-web</artifactId>
			<version>3.0.5.RELEASE</version>
		</dependency>
		<dependency>
			<groupId>org.springframework</groupId>
			<artifactId>spring-webmvc-portlet</artifactId>
			<version>3.0.5.RELEASE</version>
		</dependency>
		<dependency>
			<groupId>org.springframework</groupId>
			<artifactId>spring-test</artifactId>
			<version>3.0.5.RELEASE</version>
		</dependency>
		<dependency>
			<groupId>org.springframework.webflow</groupId>
			<artifactId>spring-webflow</artifactId>
			<version>2.2.1.RELEASE</version>
			<exclusions>
				<exclusion>
					<groupId>org.springframework.webflow</groupId>
					<artifactId>spring-js-resources</artifactId>
				</exclusion>
			</exclusions>
		</dependency>

		<dependency>
			<groupId>javax.servlet</groupId>
			<artifactId>jstl</artifactId>
			<version>1.1.2</version>
		</dependency>
		<dependency>
			<groupId>taglibs</groupId>
			<artifactId>standard</artifactId>
			<version>1.1.2</version>
		</dependency>

		<dependency>
			<groupId>javax.portlet</groupId>
			<artifactId>portlet-api</artifactId>
			<version>2.0</version>
			<scope>provided</scope>
		</dependency>

	</dependencies>

</project>
We can now build our portlet. If we run “maven package” on our project, a war is generated which is deployable on a portal.
Optional: liferay-portlet.xml
Usually, a liferay portlet also has a liferay-portlet.xml. This is only really necessary if you want to use some Liferay specific features, but when using Liferay, it always is good practice to include. If you want, add the following liferay-portlet.xml to your portlet application:
<?xml version="1.0" encoding="UTF-8"?>
<!DOCTYPE liferay-portlet-app PUBLIC "-//Liferay//DTD Portlet Application 6.0.0//EN" "http://www.liferay.com/dtd/liferay-portlet-app_6_0_0.dtd" >
<liferay-portlet-app>
	<portlet>
		<portlet-name>sample</portlet-name>
		<action-url-redirect>false</action-url-redirect>
	</portlet>
</liferay-portlet-app>
Deploying the portlet to Liferay
1. Download Liferay
First, download Liferay Community Edition 6.0 from http://www.liferay.com/downloads. We use the version bundled with Tomcat. Extract the downloaded zip to your harddrive.
2. Install the Eclipse Liferay IDE
Although it is not necessary to use the Liferay IDE for Eclipse, we recommend it in this article. You can read about it at Liferay IDE Overview and figure out how to install it at the Liferay IDE Installation Guide.
In short, you just have to add http://releases.liferay.com/tools/ide/eclipse/helios/stable/ as an update site within Eclipse(Help>Install New Software in Eclipse) and install the plugins present on that location.
Note: There is also a Liferay Developer Studio, which is a bit more extended than the regular Liferay IDE, but for the purpose of this article, the Liferay IDE suffices.
Add the Liferay Server to the Eclipse Servers panel
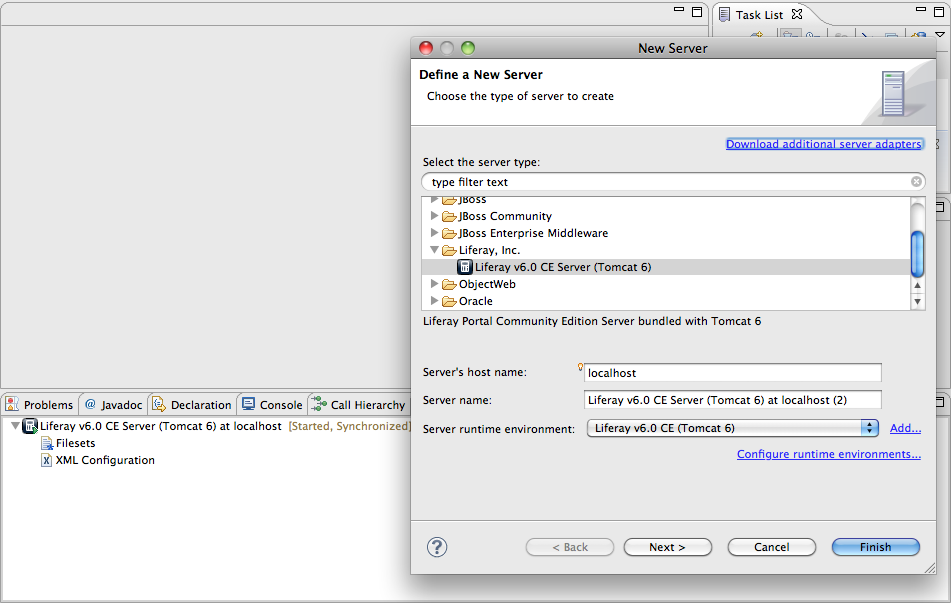
Open the Eclipse Servers panel(Window>Show View>Servers) and rightclick in this window. Choose New>Server, open the map “Liferay, Inc.” and select Liferay v6.0 CE Server(Tomcat 6) as Server Type. Click next and enter the Liferay tomcat directory: point to the tomcat within your extracted Liferay installation. Add the server.
Start the server
Rightclick on the server and press “Start”. The server will now be started and you will be able to access the portal in your browser through http://localhost:8080
Note: If you have trouble starting the server, add the following vm arguments -Xms1024M -Xmx1024M -XX:MaxPermSize=256M and increase the server timeout(double click on the server in the Servers window).
Add the portlet to the server
Rightclick on the server again and choose “Add and Remove”. You can now choose to add any projects eligible to be deployed on the server(if your project is not, you probably need to add the dynamic web module Eclipse facet to your project). Our portlet project should be in the list under “Available”. Move it to the server(“Configured”). It should automatically be published(if not, rightclick on the server again and press “Publish”).
Add the portlet to a portal page
Now Liferay is started, log on to Liferay(test@liferay.com with password test is the default test user on Liferay 6.0) and choose Add on the menu in the top, then >More>Undefined>our portlet. The portlet we made will then be added to the page.
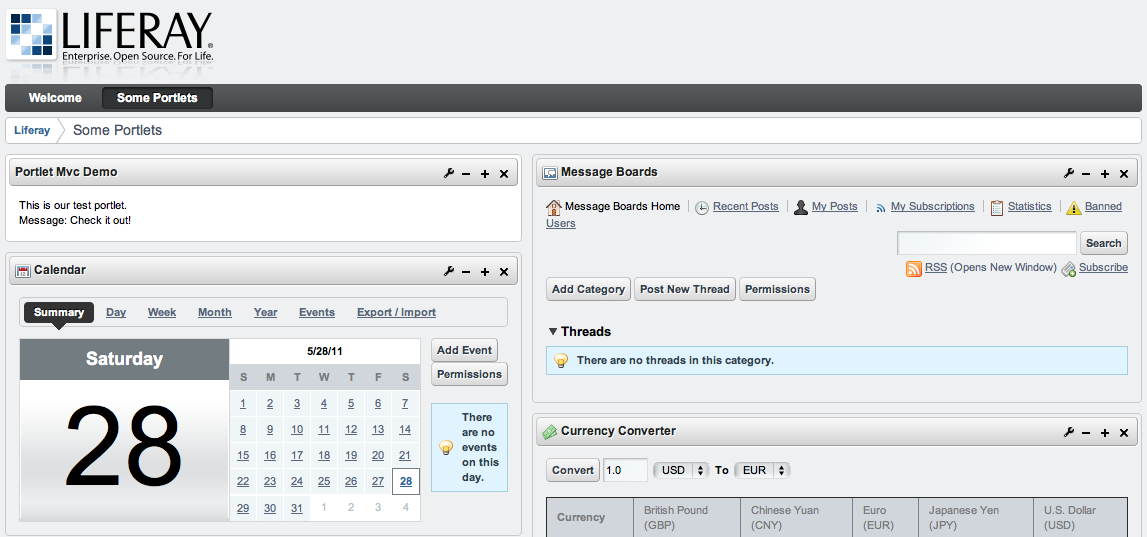
The portlet we developed is now deployed and visible on a portal. See how we already edited its background by using the portal “Look and Feel” feature.


 In this blog, Steffen Luypaert gives tutorials on how to integrate Java frameworks and third-party APIs with each other.
Thank you , for the basic stuff , do you have any working examples of editable portlets with spring.
Very nice article, from basics… Do you know if, and how, a portlet can be displayed inside a Web page using normal servlet features with Spring? Spring supports using Portlet MVC with normal MVC?
Was this answer helpful?
LikeDislikechán quá
Was this answer helpful?
LikeDislikeReally Nice article. Thank You Very Much…
Thank for the article.. It was very helpfull to get started
Was this answer helpful?
LikeDislikeVery Nice article. Thank You Very Much…
Was this answer helpful?
LikeDislikeVery well written!!
Was this answer helpful?
LikeDislike