Setting up Drools Guvnor
Introduction
This blog article describes how to setup Drools Guvnor, the business rule management server that accompanies Jboss Drools. We describe what it is and discuss how to install and configure it, how to add model jars and add rules that act on the pojos of these model jars using the user friendly interface. We describe how to load the guvnor rule packages from external applications and fire their rules, or, how to import them into the project workspace with the Eclipse Guvnor Tools that come with the Jboss Tools plugin. Finally, we mention the Guvnor rest API and describe one of its use cases.
What is Drools Guvnor?
Drools Guvnor is a repository for Drools rules. It keeps Drools rules and the models on which the rules act in a centralised place, and manages their versioning as well.
On top of the repository sits a web application, that provides GUIs, editors and tools to aid in the construction and management of large numbers of rules, and with which domain experts – usually non programmers – can view and edit rules.
Installation
Installation is very straight-forward. After you get Guvnor from http://www.jboss.org/drools, you rename the drools-5.1.1-guvnor.war to drools-guvnor.war. Then you copy the war file into the deploy folder of your application server and then you start that app server. For the purpose of this tutorial, I used a Jboss 5.1 server. From then on, the drools web interface is available at http://localhost:8080/drools-guvnor. The basic configuration requires authentication, but user and password can be anything.
Changing the repository location
By default, the repository is kept within the app server itself. For JBoss Application servers, this repository is created in their bin directory(basically, the repository is created in the folder you start your app server from). The repository.xml file is created there, together with the repository folder. The repository.xml contains all the metadata for the repository and the repository folder contains the whole repository itself(well, by default – if the rules and models and the like are stored in an external database, as we will discuss next, this is not the case anymore).
Often, it is better to choose another location than the bin folder of your app server for your repository xml and folder.
Guvnor is a Seam application, and the repositoryConfiguration is a Seam Component within the application that is defined in the components.xml.
To change the location of the repository, unzip the war file, locate the components.xml file in the WEB-INF directory, and set the homeDirectory property of the repositoryConfiguration bean:
<?xml version="1.0" encoding="UTF-8"?>
<components ...>
   <core:init transaction-management-enabled="false"/>
   <transaction:no-transaction/>

   <component name="repositoryConfiguration">
      <property name="homeDirectory">/development/rules_repository</property>
   </component>
   ...
</components>
If we start the app server again, the repository xml and folder will be created in the new folder(/development/rules_repositor here) if they are not present.
Changing the database
Guvnor uses Apache Jackrabbit for storing its assets, such as rules and model jars. Apache Jackrabbit is configured by the repository.xml we mentioned before. By default, the rules will be persisted to a Derby database, for which all data will be persisted within the db folder of the workspace. Basically, the PersistenceManager for every workspace is configured like this by default in the repository.xml:
<PersistenceManager class="org.apache.jackrabbit.core.persistence.pool.DerbyPersistenceManager">
   <param name="url" value="jdbc:derby:${wsp.home}/db;create=true"/>
   <param name="schemaObjectPrefix" value="${wsp.name}_"/>
</PersistenceManager>
If you would want to use an external db2 database for persistence, you would change the PersistenceManager for the workspace:
<PersistenceManager class="org.apache.jackrabbit.core.persistence.bundle.BundleDbPersistenceManager">
   <param name="driver" value="com.ibm.db2.jcc.DB2Driver"/>
   <param name="url" value="jdbc:db2://192.168.1.9:50000/db2inst1"/>
   <param name="user" value="db2inst1"/>
   <param name="password" value="test"/>
   <param name="schemaObjectPrefix" value="${wsp.name}_"/>
   <param name="schema" value="db2"/>
</PersistenceManager>
Note that the configuration for the workspace in the repository.xml is just a template from which the workspace.xml for each workspace is generated. If your workspaces are already there, you will need to go change the PersistenceManager in these workspace.xml files as well(they are under the workspaces folder in the folder where the repository.xml is located).
Uploading the business model to Guvnor
Before rules can be defined in Guvnor, a business model(a set of Java classes) jar needs to be uploaded to Guvnor. To not clutter the text, I am going to assume that you know how to make Java classes, compile them and put them in a jar, e.g. to construct a business model. In this tutorial, I am going to use a banking business model, with classes like Person and LoanFormula, but you can use any other business model.
There are several ways to upload a business model to Guvnor. Some others will be discussed later in this article, but the easiest way is by using the web interface. Log on to Guvnor(through http://localhost:8080/drools-guvnor) and go to the “Knowledge Bases” tab. Click on “Create New” right under the tab and choose “New Package”. Give your package a name – I choose “banking” – and press Ok.
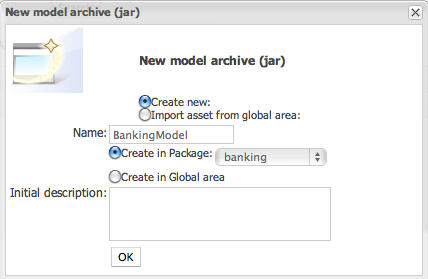
Then “Create new” – “Upload new Model Jar”.
Give your model a name:
and then choose and upload the jar:
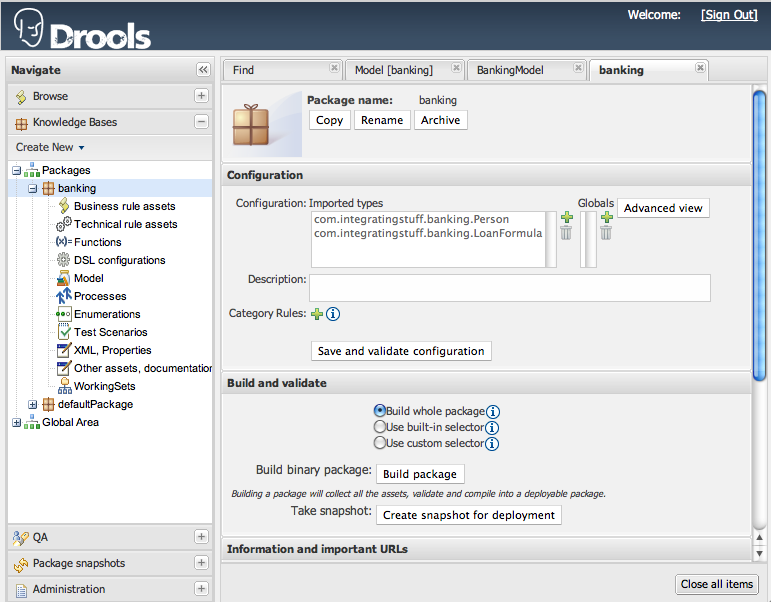
after which we end up with a package like this:
Note that for every fact that is declared, Drools recursively needs all the dependencies on these facts. This poses problems from time to time. For example, in Enterprise Java Development, chances are high that your business model classes are annotated with JPA annotations, which need the JPA libs, which need other libs in turn. One has two options to deal with this. The first is to make a special build that strips all annotations from your classes and then compiles them again so they are really pojos that do not require any external libs at all. The second is to upload all dependencies(which can be easily done by making a jar with all dependencies included, which can be easily done with the maven-assembly-plugin or a custom ant script) and then exclude all non-business-model-facts from the list in the package.
Adding a sample rule
Now the model is uploaded, we can start defining rules.
To add a rule, you have to create a Category first(Administration>Category>New Category). Rules always have to reside under at least one Category in Guvnor. I choose to create the category “Banking”.
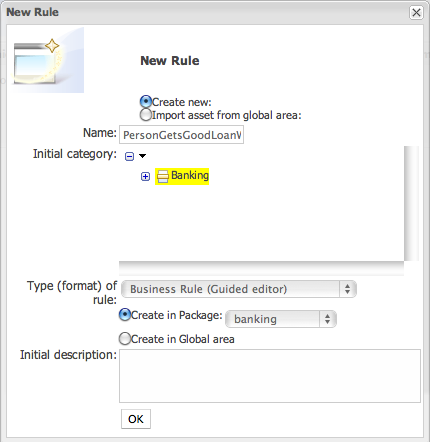
Once the category is created, go back to the “Knowledge Bases” tab and choose Create New>New Rule this time.
Enter a name for the rule:
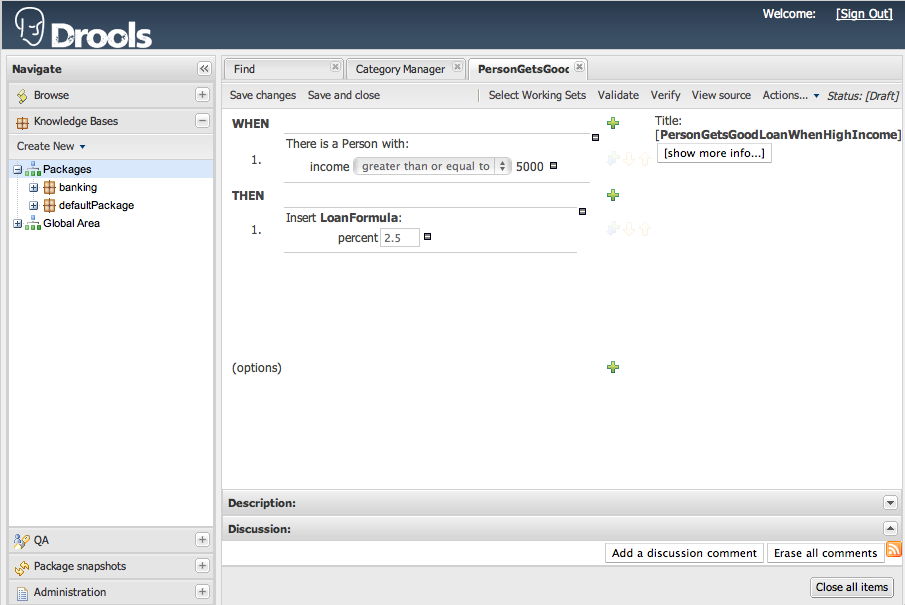
And then invent the rule on the business model we just uploaded:
Note however that, although the graphical interface is quite nice, it is still somewhat (too?) limited.
One of the shortcomings is that Guvnor seems to limit the Drools syntax. The interface for doing a “from $collection” is there, but such a rule is not saveable. However, all shortcomings can be circumvented by using free form drools syntax, but that kinda defeats the whole purpose of the interface.
Packaging our rule package
Before an external application can use the rules in our banking package, we have to make a package snapshot first.
You can do this by going to the “Package Snapshots” tab and choosing Deploy>New Deployment Snapshot.
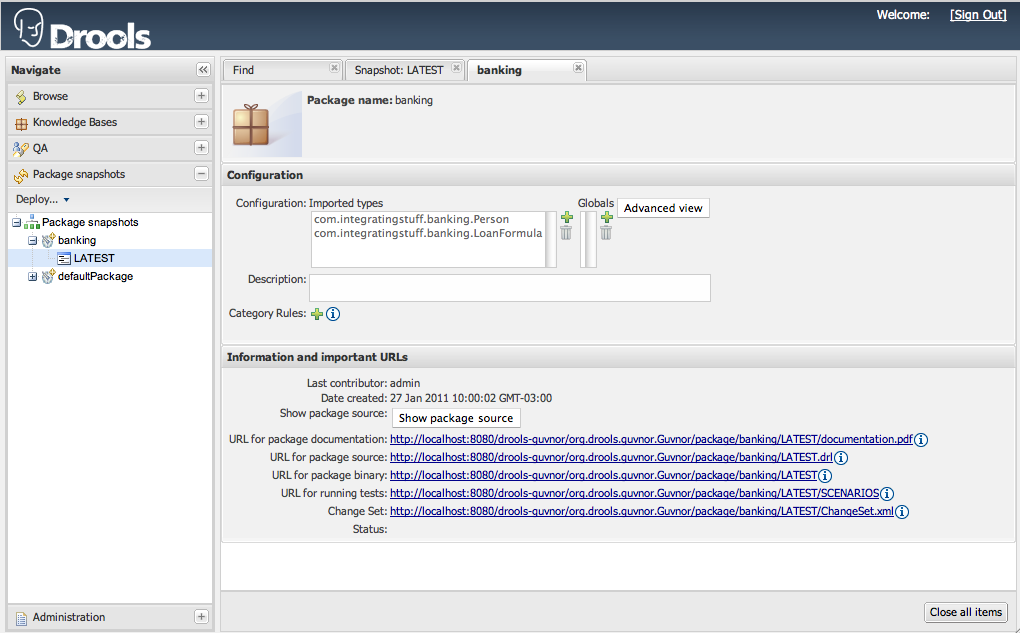
We name our package snapshot “LATEST” and end up with:
Notice all the links. External applications will be able to load the rules from the package binary link for example, which is what we are going to do next.
Calling a Guvnor rule package from an external Java application
The following jUnit TestCase will fetch and call the rule in our package:
public class GuvnorTest extends TestCase{

	public void testDroolsWithGuvnor() throws Exception {
		KnowledgeBase knowledgeBase = createKnowledgeBase();
		StatefulKnowledgeSession session = knowledgeBase.newStatefulKnowledgeSession();
		try {
			Person person = new Person();
			person.setIncome(6000d);
			session.insert(person);
			assertTrue(session.getFactCount() == 1);
			session.fireAllRules();
			assertTrue(session.getFactCount() == 2);
		}
		finally {
			session.dispose();
		}
	}

	private static KnowledgeBase createKnowledgeBase() {
		 KnowledgeAgentConfiguration kaconf = KnowledgeAgentFactory.newKnowledgeAgentConfiguration();
		 kaconf.setProperty( "drools.agent.scanDirectories", "false" );
		 KnowledgeAgent kagent = KnowledgeAgentFactory.newKnowledgeAgent( "test agent", kaconf );
		 kagent.applyChangeSet( ResourceFactory.newClassPathResource("changeset-banking.xml"));
		 return kagent.getKnowledgeBase();
	}
}
Note that the test expects two facts in the session after execution of the rule. If you would change the income to 4000 instead of 6000 the rule wouldnt fire anymore(check the screenshot which displays the rule we added) and the test would fail since, after execution, there would still be only one fact in the session.
Note also that we are not using the package links mentioned in the previous section directly. Instead, we are using a changeset-banking.xml that has one of those links defined and looks like this:
<change-set xmlns='http://drools.org/drools-5.0/change-set'
    xmlns:xs='http://www.w3.org/2001/XMLSchema-instance'
    xs:schemaLocation='http://drools.org/drools-5.0/change-set
    http://anonsvn.jboss.org/repos/labs/labs/jbossrules/trunk/drools-api/src/main/resources/change-set-1.0.0.xsd' >
   <add>
      <resource
      source='http://localhost:8080/drools-guvnor/org.drools.guvnor.Guvnor/package/banking/LATEST.drl'
      type='DRL' basicAuthentication="enabled" username="admin" password="admin" />
   </add>
</change-set>
Basically, it contains the links to the Guvnor package resources, and the authentication configuration to access those resources.
Basic Guvnor usage
All of the previous covers basic Guvnor usage: creating a category and package, uploading a model, define some rules on the model and package the package, so it can be called by an external application using Drools.
IDE tooling
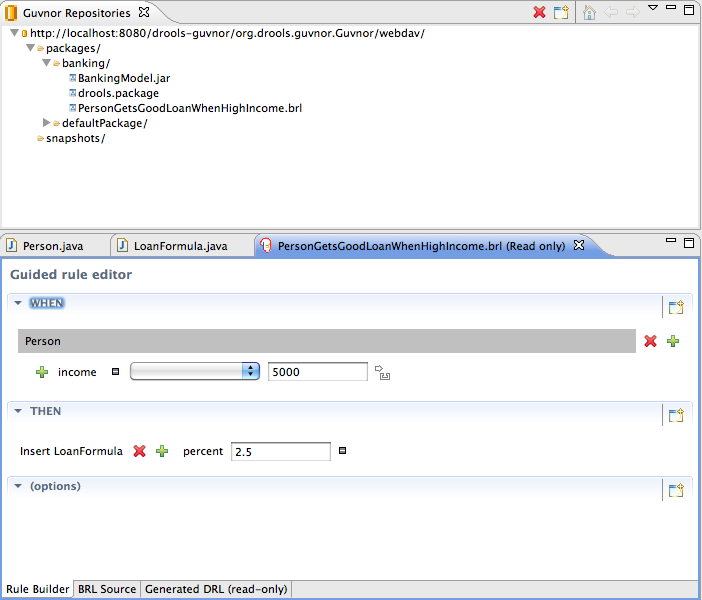
With the Jboss Tools plugin for Eclipse come some specific Eclipse Guvnor Tools. The most interesting of these, in my opinion, is the Guvnor Repositories View. Guvnor repositories can be added under that view and elegantly browsed.
Project resources can also be added to a Guvnor package from the rightclick menu for the resource by choosing Guvnor > Add within Eclipse. The other way around, resources can be dragged from the Guvnor repositories view into the workspace, modified there and then be committed back to Guvnor(Guvnor>commit). It is also possible to upload the model using this model or to download the most recent rule package into the workspace so it can be included in the project build instead of being remotely fetched from Guvnor at runtime.
Using the Guvnor rest API – Uploading the model
Guvnor does not come with a webservice offering all its functionality(an inclusion of such a webservice is the number one feature for Guvnor on my wishlist), but only offers a rest api for uploading and downloading assets. However, this rest api has some useful use cases.
For example, the following code could be used to automate the uploading of the business model to Guvnor as part of a build process:
public class PostModel {

	public static void main(String[] args) {
		try {
			HttpClient client = new HttpClient();
			String url = "http://localhost:8080/drools-guvnor/org.drools.guvnor.Guvnor/api/packages/banking/BankingModel.jar";

			Credentials defaultcreds = new UsernamePasswordCredentials("admin", "admin");
			client.getState().setCredentials(new AuthScope("localhost", 8080, AuthScope.ANY_REALM), defaultcreds);

			//delete old model
			DeleteMethod deleteMethod = new DeleteMethod(url);
			int statusCode1 = client.executeMethod(deleteMethod);
			System.out.println("statusLine>>>" + deleteMethod.getStatusLine());
			deleteMethod.releaseConnection();

			//post new
			PostMethod postMethod = new PostMethod(url);

			client.setConnectionTimeout(8000);

			// Send the model file as the body of the POST request
			File f = new File("smeg_model.jar");
			System.out.println("File Length = " + f.length());

			postMethod.setRequestBody(new FileInputStream(f));
			postMethod.setRequestHeader("Content-type","text/xml; charset=ISO-8859-1");

			int statusCode2 = client.executeMethod(postMethod);

			System.out.println("statusLine>>>" + postMethod.getStatusLine());
			postMethod.releaseConnection();

		} catch exceptions...
	}
}



 In this blog, Steffen Luypaert gives tutorials on how to integrate Java frameworks and third-party APIs with each other.
Great write-up. Do you know if anyone has modified Seam 2.x security to use KnowledgeAgent rather than RuleAgent? At first glance it appears that RuleBasedPremissionResolver.java would need modification. Then, the security rules could also be maintained in Guvnor (5.1).
Was this answer helpful?
LikeDislikeYou have given a example of Using the Guvnor rest API – Uploading the model.. In the same way is there any ways of uploading the process with rest API ?
Was this answer helpful?
LikeDislikeA well written article about guvnor. I’m a newbie to jbpm, so wanted to if we could register the process in guvnor using the same code. If not then, is there any other way to do it?
Was this answer helpful?
LikeDislike